Want to create a website contains amazing photos and videos? Want to enrich your current website with other colorful elements? Is it difficult? No, the answer is No. With the help of Flash Video MX Pro, all of these will become easy. Below steps will tell you how easy the website will be established under the help of Flash Video MX Pro.
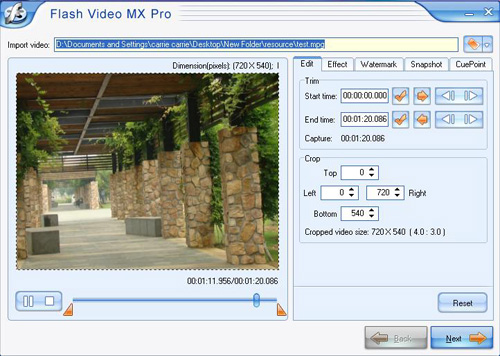
1) First step. Start the Flash Video MX Pro and import the video which you want to post to the website. See the below picture.
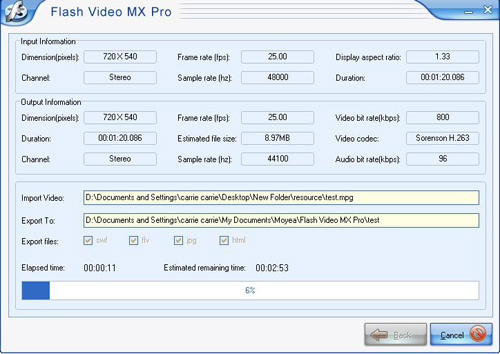
2) Second step. Click the button Next, you will come to the below interface. Have you noticed the option red marked below? Remember to check the “Generate HTML file”, this option will provide you an html file and help to create website later.

3) Third step. Start conversion and you will get the output folder after the conversion is finished.
From the HTML file, you will get the code similar to the following:
<!--url's used in the movie-->
<!--text used in the movie-->
<!-- saved from url=(0013)about:internet -->
<!--<object classid="clsid:D27CDB6E-AE6D-11cf-96B8-444553540000" codebase="http://download.macromedia.com/pub/
shockwave/cabs/flash/swflash.cab#version=7,0,0,0" width="400" height="300">
<!--<param name=movie value="mflvplayer.swf?playerOpts=targetClip*demo.flv*s">
<!--<param name=quality value=high>
<!--<embed src="mflvplayer.swf?playerOpts=targetClip*demo.flv*s" quality=high pluginspage="http://www.macromedia.com/shockwave/d
ownload/index.cgi?P1_Prod_Version=ShockwaveFlash" type="application/x-shockwave-flash" width="400" height="300">
</embed>-->
</object>-->
Well, have you noticed the mflvplayer.swf in blue? The width="400" height="300" in black indicates the width and the height of your video.
The playerOpts=targetClip*demo.flv*s in bold indicates the name of the FLV file to be played while demo.flv is your video. You might be curious about targetClip, the asterisk separator and the "s" in the end.
In fact, playerOpts is not that simple. PlayerOpts consists of several segments, each of which is separated by "||", and each segment contains a property of the control bar. One segment is divided into 3 parts by the asterisk (*). The first part is the property name, the second part is the property value and the third part is the data type of the property. For instance, targetClip*demo.flv*s is a segment, targetClip is the property name, demo.flv is the property value and the "s" is the character string type of this property. This segment is to specify the path from which the control bar can play the video. There are also other properties. You can set multiple properties at a time, using "||" to separate different segments, code like the following:
playerOpts=targetClip*demo.flv*s||panelColor*255,0,0*c
In this way, when you are setting the targetClip property, you are also setting the panel color property. The panel color is the control bar color, the data type is color "c", and 255,0,0 is the RGB color. Please notice that the property name and data type are case sensitive.
Therefore, by expanding the code, you can enrich your website and create one web with streaming video you like.