In this video booming time, video-sharing sites are more and more popular that many people would like to make their own video sites for business or personal need. Sometimes when we are surfing online watching YouTube videos or Google videos, we will find there is a sign on the screen when the video is loading or buffering. This article is to tell you how to add this loading sign to your video and upload online.
Of course this could be done with Flash 8 or Flash CS3, but it's too complicated. Here I'd like to recommend you a program which provides nice preloader selections. It is called Flash Video MX Std.
Before I start to list the steps, let's make it clear that what is sharing online is mostly FLV, so this program is the right one to encode FLV and from other video formats. You are also able to import FLV and output as a Flash with Flash player and preloader.
Here are the simple steps.
1. Install and launch Flash Video MX Std
2. Import and edit the video
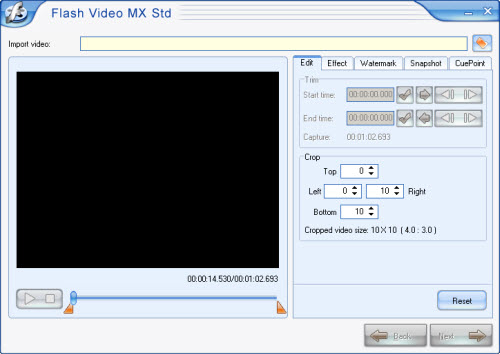
Click the folder icon behind the Import video box, and you are able to load the desired video from local. With the tabs of edit, effect, watermark, snapshot, and cue point, you can trim, crop, adjust effects, add text and image watermarks, snap a thumbnail, etc. After all the settings in this section, click next to continue.
3. Output settings
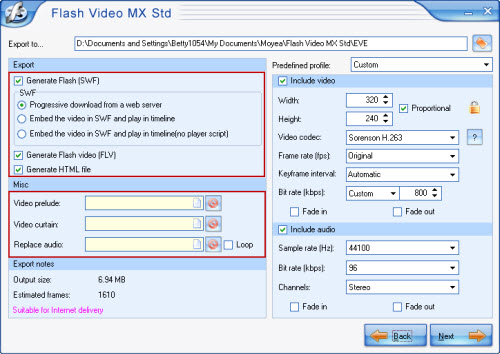
In this section, you can set the path you'd like the output files to place with Export to…
Note: Please do check Generate Flash (SWF) and select Progressive download from a web server or Embed the video in SWF and play in timeline, since the preloader effect is based on a SWF file with player script. The other choices here are selective.
In Misc area, you are able to add movie beginning and movie end to the video and replace its audio. If you don't like to change the other parameters, just click next.
4. Add preloader
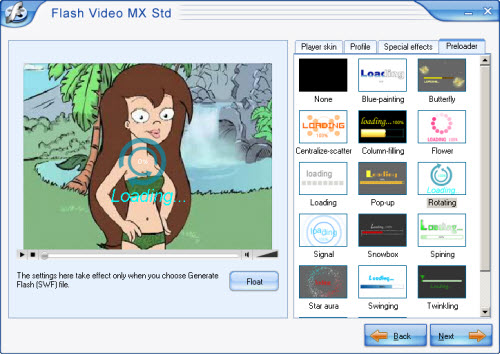
Now we face the section to add preloader. By selecting the preloader tab, you will find many selections. Choose your favorite one and preview it on the left pane. You are also able to select player skin, special effects and set other parameters.
5. Start conversion
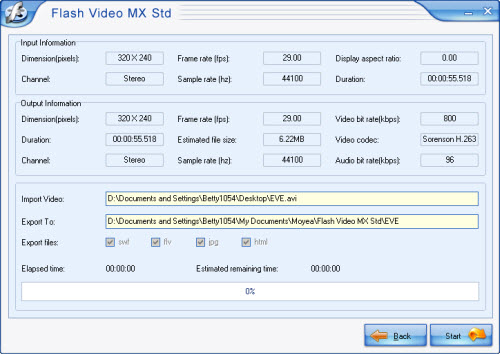
Click the Next button, and you will face the following interface showing the information of your video, if you don't want to change, just click Start to convert. The conversion will be finished in a short time and the output folder will pop up.
6. Upload online and see the effect.
After the conversion, all the files are ready for uploading online. You can upload them with FTP to the same folder of your server. Then embed the video to your web page with the following codes.
<object classid="clsid:D27CDB6E-AE6D-11cf-96B8-444553540000" codebase="http://download.macromedia.com/pub/shockwave/cabs/flash/swflash.cab#version=8,0,0,0" width="720" height="555">
<param name="movie" value=" EVE.swf">
<param name="quality" value="high">
<param name="allowScriptAccess" value="sameDomain" />
<param name="allowFullScreen" value="True" />
<embed src="EVE.swf" quality="high" pluginspage="http://www.macromedia.com/go/getflashplayer" type="application/x-shockwave-flash" width="720" height="555" allowScriptAccess="sameDomain" allowFullScreen="True">
</embed>
</object>
Well, now you notice the EVE.swf in bold. Replace it with the SWF file you generated. Here you can also type in the URL of the SWF, such as http://www.myhomepage.com/mflvplayer.swf
The width="720" height="555" in black indicates the width and the height of your video.
You can add or reset the param name values to configure the video.
And then, you can see the following effect.
This preloader does not only work at the beginning of the video, it will also show up any time when the video needs to buffer.