Flash Video MX Pro
- Video conversion to FLV & SWF
- DVD conversion to FLV & SWF
- Flash 8 video encoding
- Flash 8 Alpha video video encoding
- Flash Player with brilliant skins
Home video formats like AVI, MPEG, WMV and MOV are not suitable for online sharing and viewing. In contrast, Flash video and SWF video are widely used in product display which is smaller in size and more convenient for transmission over the Internet.


1. The advantage of Flash SWF and FLV
FLV or Flash Video is a brand-new stream media format which utilizes the Flash Player widely used on the webpage and can integrate the video into the Flash animation. It has higher compression rate, better quality and faster downloading speed. SWF (Adobe Flash or Flash movie ) is also an another typical interactive video format online which you can make as the FLV player embedded in an HTML page thus the viewers have no need to download other players to watch the video created by you.
FLV or SWF can be created from nearly all types of video formats, such as DVD, MPEG, AVI, MPG, WMV, RM, RMVB, MOV, ASF and MP4,etc.
Therefore, In order to post your favorite videos onto your commercial website, your personal blog and BBS to share with others, you need to convert the videos into Flash format first. But by what means shall you convert the video formats such as AVI, MPEG, WMV in to a totally different format? The answer is that you need a Flash conversion tool.
Moyea Flash Video MX Pro is a professional conversion tool to convert video to FLV and Adobe Flash (SWF) for sharing and promoting over the Internet which can perfectly decode the common video formats and encode them in to FLV. Please download the program at Flash Video MX Pro Download Page to experience its extraordinarily wonderful function first.
2. Step-to-step demonstration on how to make FLV or SWF video
Step1 Launch the program and input the video file
Click "Folder" and input the video in. This converter can convert videos in various formats like AVI, MPEG, MP3, WMV, ASF, etc. Flash Video MX also can convert Apple Quicktime video to Flash.
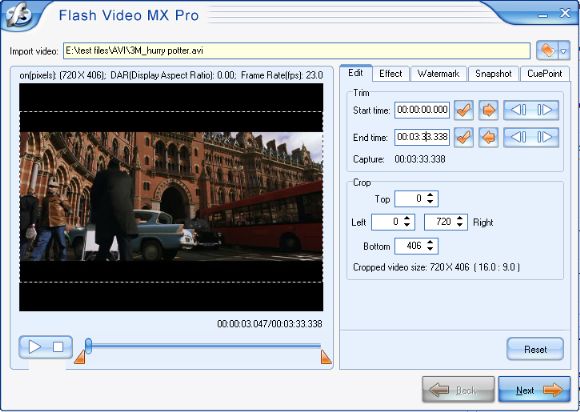
Step2 Editing the video
On the Edit tab, you can trim the video duration, and crop the video content to save part from the video. The following parts illustrate the detail information.
In the Trim section, the trim function helps to trim the video duration, and this is probably the easiest way to establish precise control of your clip timing.
1. Enter the time where you want the video clip to start in the Start Time area.
Click the button ![]() to confirm the start time and end time. Alternatively, it is easier to trim the video during playing.
to confirm the start time and end time. Alternatively, it is easier to trim the video during playing.
You can also click the button ![]() to the frame where you want the video clip to start or end.
to the frame where you want the video clip to start or end.
2. You can even drag the line under the left preview window to select part of the video quickly.
3.The video duration time will be displayed in the Capture area.
In the Crop section, you can crop the video content to save part from the video.
1. In the left panel, use the video preview selector-dragging the slider controls to crop the video.
2. Alternatively enter values in the spin controls for the right, left, top, and bottom edges to crop the video. The cropped information will appear in the bottom of the pane, such as video size, aspect ratio.
Step3 Adjusting the video effects
The Effect tab contains some options that can be used to adjust the video effects.
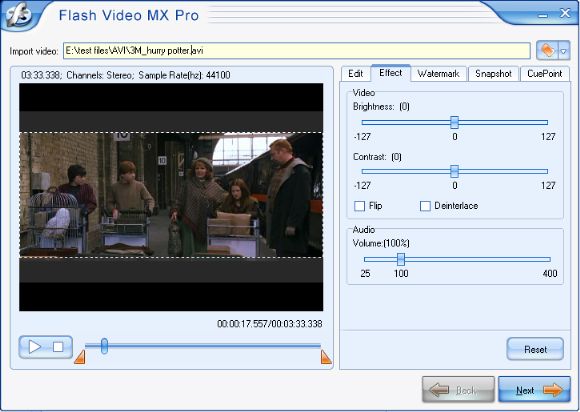
1. In the Video section, drag the Contrast slider to adjust the contrast.
2. Drag the Brightness slider to correct for any changes in exposure.
3. By checking the Flip box, you can flip the video vertically.
4. The Deinterlace option helps to eliminate the interlace artifacts to get better viewing effects.
5. In the Audio section, drag the Volume slider to adjust the original volume for your video
Step4 Adding watermark to video
Add image
On the watermark tab, there are options to add image watermark, and text to the video. When the video plays to the point that you want to add image or text, please click the![]() .button. Then select the Add Image or Add Text in the drop-down list.
.button. Then select the Add Image or Add Text in the drop-down list.
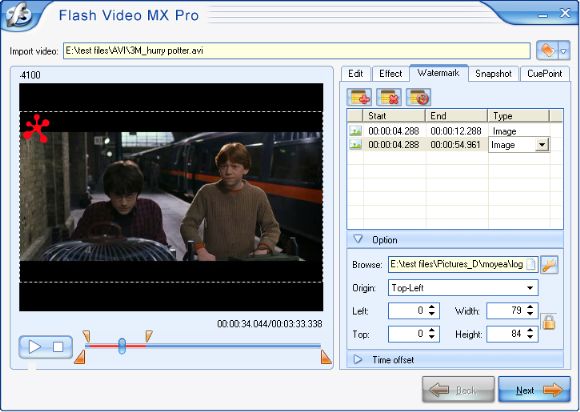
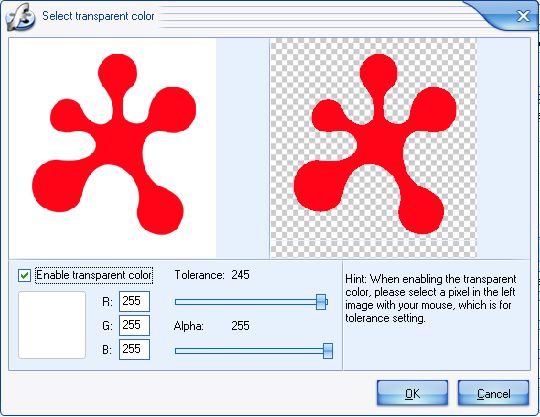
Click the "Transparency" button and you will open a pop-up. Click your mouse on the left picture to select a transparent color. Drag Tolerance slide bar to adjust the tolerance. and drag the Alpha slider to adjust the alpha attribute. Click OK to return to the logo setting.
Add Text
Drag the slide bar to the time point you want to add image or text by pressing the Pause button, which will then be shown in the list of Time. Click the option of Delay to set the duration. Below the tab of Type, there are two options available under the pull down menu: image and text. Choose "Text". In the Caption box, enter the text you want to
add. To change the font, click the button![]() , and then the Select Font dialog will appear.
, and then the Select Font dialog will appear.
From the drop-down menus of Font, Style, Size and Color, select what you need.
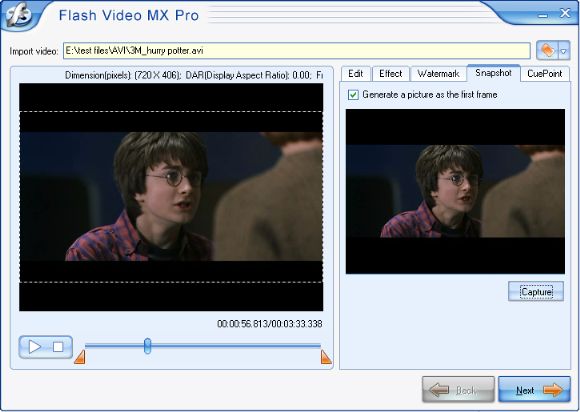
Step4 Snapshot
The Snapshot tab provides the function of capturing a picture from the video for the first frame of the output video. The Capture button helps you to capture any frame of the video as a thumbnail.
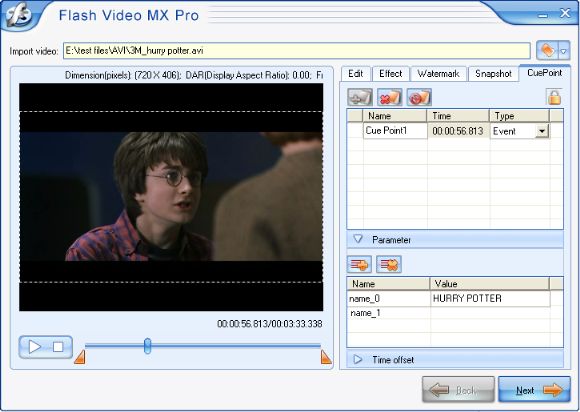
Step5 Cue point
To add subtitle to your video, please press the CuePoint tab and you will see the settings of cue points which allow
you to specify the watermark and text at each specific time you like. When the video plays to the frame that you want to
add cue point, click the ![]() button to add a cue point and the
button to add a cue point and the ![]() button to delete the chosen cue point.
button to delete the chosen cue point.
In the first list, you can rename the cue point and select the cue point type. There are two types of cue points you get: navigation, event.
1. Click the![]() button to set the parameters for the selected cue point.
button to set the parameters for the selected cue point.
2.Set the name and value for parameters in the second list. By clicking the ![]() button, you can delete the parameter.
button, you can delete the parameter.