More and more people are interested in Flash video delivering these days and some are even interested in encoding FLV, editing the FLV, and uploading the generated files to website and blog. This article is to tell you how to encode FLV files from other video formats, edit and upload for online sharing. If you already have Moyea Flash Video MX Pro installed, you will find the steps extremely easy.
You only need an extra freeware here, FLV Editor Lite. It perfectly edits your FLV/F4V videos from Flash Video MX, YouTube, MySpace, Fox, etc. You can trim FLV/F4V, cut FLV/F4V, merge FLV, F4V, replace audio, rip video and audio, add metadata and cue point, etc.
Export FLV from other common video formats with Flash Video MX Pro.
With Flash Video MX Pro, you can generate FLV from AVI, MPEG, WMV, MOV, MP4, 3GP, DVD, etc. You can also do some simple editing with it like cropping size of a video length, adding watermarks, etc. While exporting, you have selections of FLV, SWF, and HTML.
It’s very easy with steps below:
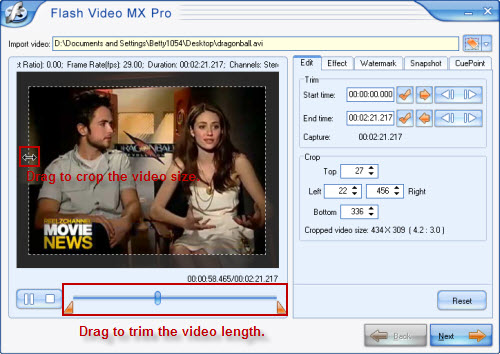
1. Import video
Clicking the folder button, you can import video for converting. For multiple videos, you can launch Batch Encoder for the FLV encoding.
As is shown in picture below, in the first section, you can trim, crop, adjust effect, add watermark, capture snapshot, and add cue points. It’s very easy to handle, just some clicks and drags.
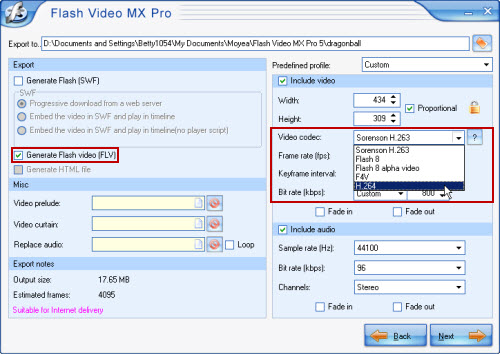
2. Output settings
In the next section, you can select output format, video codec, etc. If you’d like to edit with FLV Editor Lite later, here I recommend you to check “Generate Flash video (FLV)”. If you’d like to upload the exported file directly to your server for uploading online, you can check “Generate Flash (SWF)” and upload all generated files to the same path.
In Video codec box, you can select what codec to use for encoding the FLV. If you’d like to get higher quality, you can select F4V or H.264.
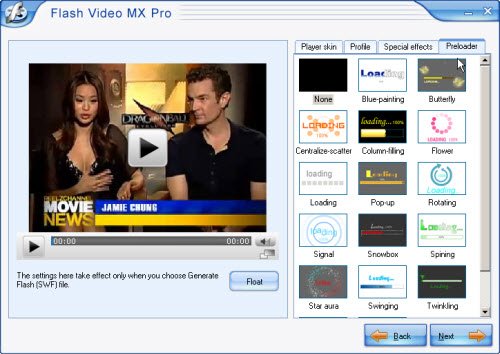
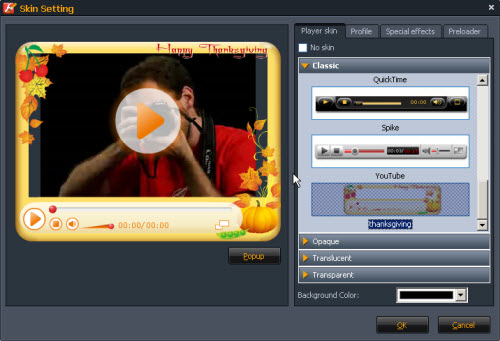
3. Player skins settings
If you have checked to generate Flash (SWF), you will enter the following section by clicking “Next”. And then you can select player skin, preloader, and special effect. You can also set the profile for the player.
If you have only checked to generate Flash video (FLV), you will be directed to the following section.
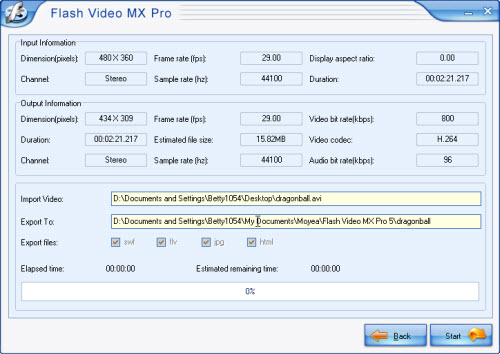
4. Export FLV
In this section, you can see the detailed information of all settings, you can click “Start” to encode, or “Back” to reset.
After the encoding, you can get the FLV file. Maybe you need some part of the whole video be deleted, or you want to add some clip in the middle of the FLV. FLV Editor Lite is in need. The Timeline editing feature will help you in large scales.
Edit FLV with FLV Editor Lite.
Having a try, you will be attracted with its timeline. You can easily trim FLV/ F4V/ MP3, cut FLV/ F4V/ MP3, merge FLV/ F4V/ MP3, replace audio, add metadata and cue point, or export MP3 from FLV with MP3 codec. Its output is also flexible. You can export to your computer, Media Library of YouTube FLV Downloader, FLV to Video Converter Pro 2, or export SWF directly with player skin, preloader, special effect for uploading online.
The following is an easy guide.
1. You have several ways to import files. For Lite version, you can only import 5 files at most, in which only a single MP3 can be imported. The Ultimate version is without limitations and with more powerful functions.
All files imported will be placed in Resource List. You can double click on file to play. To edit, you can drag the file to Timeline.
2. Edit FLV.
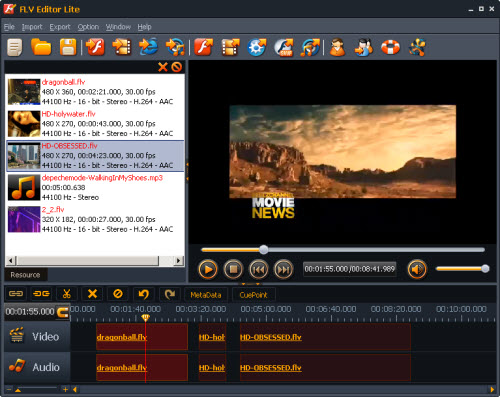
While you are editing, you can real-time preview the clip by clicking the Play button on Preview Pane.
Merge FLV/ F4V/ MP3: No matter how many clips you have placed on timeline, they will be exported as a single FLV.
Rip audio and video/ Replace audio: To rip audio and video, you can select a clip on Timeline and click the Unlink button on Timeline Toolbar. Or you can select and right click on Timeline to select Unlink on right-click menu. And then, you can select and delete the unwanted audio and drag in an MP3, or FLV audio. Select the audio and video with the help of Ctrl on Keyboard, click Link button on Timeline Toolbar, and you can attach and move them together.
Cut FLV/ F4V/ MP3: You can cut by dragging the pointer to the right position and clicking Scissor button. And then, you can arrange the order by dragging the clips on Timeline freely.
It doesn’t matter if you have done something wrong on the Timeline. You can click Undo or Redo button to cancel your previous setting. If you are using Ultimate version, you can even save project file for future editing.
3. Export FLV
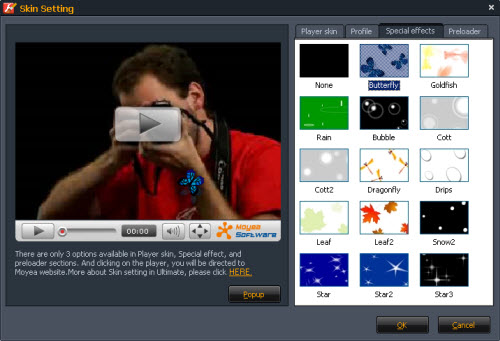
If you’d like to upload the generated file to your website or blog, you can click Export SWF button to select gorgeous player skin, special effect, and preloader. They are the same with that of Flash Video MX Pro. There are only 3 options in the mentioned 3 sections are available. But for the Ultimate version, you have 30 player skin, 14 special effects, and 16 preloaders options. You even add the free control bars from official website of Flash Video MX. All you need to do is to download and unzip the package, and copy & paste the files to the right path in your installation folder, say, C:\Program Files\Moyea\FLV Editor Ultimate\Control\Classic.
Embed SWF and upload online
After all settings and steps, you will get an FLV, an SWF, an HTML, and a JPEG as the thumbnail. You can upload them all to the same folder on your server. And then you can stream the FLV on your website. Or after uploading the FLV, SWF, and JPEG, you can embed the video to your webpage with the codes as follows:
<object classid="clsid:D27CDB6E-AE6D-11cf-96B8-444553540000" codebase="http://download.macromedia.com/pub/shockwave/cabs/flash/swflash.cab#version=8,0,0,0" width="320" height="214">
<param name="movie" value="youtubeflv.swf">
<param name="quality" value="high">
<param name="allowScriptAccess" value="sameDomain" />
<param name="allowFullScreen" value="True" />
<embed src="youtubeflv.swf" quality="high" pluginspage="http://www.macromedia.com/go/getflashplayer" type="application/x-shockwave-flash" width="320" height="214" allowScriptAccess="sameDomain" allowFullScreen="True">
</embed>
</object>
You can replace the bold youtubeflv.swf with the right path of your generated SWF file and reset the width and height.
Well after all, you can implement any of your ideas on the video and share them online. Flash Video MX Pro and FLV Editor Lite will help you a lot.